
Calibrating your 5.1 AV receiver is an important step in getting the most out of your home theater system. Here are the steps to calibrate your AV receiver:
Introduction to Auto Calibration
Almost all AV receivers come equipped with auto-calibration microphones, which are essential for setting up your system and optimizing its sound. Each brand has its unique calibration system: Denon features Audyssey, Yamaha uses YPAO, and Onkyo has Direc. These systems help streamline the setup process and ensure your audio is finely tuned to your room’s acoustics.
1. Preparing for Calibration
Before you begin the calibration process, it’s crucial to ensure the room is as quiet as possible. Achieving pin-drop silence is key for accurate calibration. Any background noise can interfere with the calibration microphone’s readings.
2. Positioning the Calibration Microphone
Place the microphone at your usual listening position, making sure it’s at ear level. This positioning helps the system understand how sound travels and is perceived in your typical listening environment.
3. Following On-Screen Instructions
Once you’ve positioned the microphone, follow the on-screen instructions provided by your AV receiver. These prompts will guide you through the calibration process, which typically involves the receiver emitting test tones that the microphone picks up for analysis.
4. Manual Verification and Adjustment
After the auto-calibration is complete, it’s advisable to manually verify the settings. Check if the distance calculations and crossover settings are accurate. The ideal crossover frequency is usually around 120Hz, but this might vary depending on your specific setup and preferences.
Auto-calibration is a great starting point, but a manual check can fine-tune your audio experience. This ensures your receiver is tailored to your specific listening environment.
More detailed steps as follows:
Step 1: Test Tones
Most AV receivers have a built-in test tone generator that can be used to calibrate the speakers. Turn on the test tone generator and set the volume to a comfortable level. Then, listen to the test tones and adjust the volume, balance, and tone controls on the receiver until they are at the same level for all speakers.
Step 2: Speaker Placement
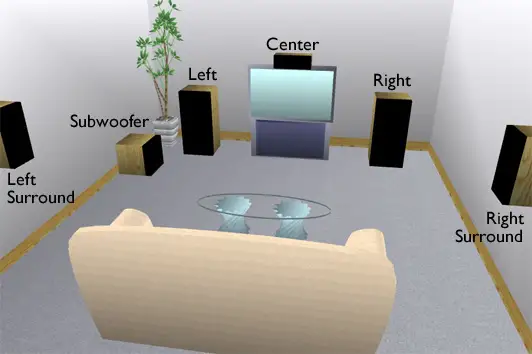
Proper speaker placement is crucial for achieving the best sound quality. Make sure the speakers are placed at the correct distance from the listening position and are angled correctly. The front left and right speakers should be at the same distance from the listening position and angled towards the center of the room. The center speaker should be placed directly above or below the TV, and the surround speakers should be placed to the side of the listening position.

Step 3: Set the Speaker Distance
Most AV receivers have a speaker distance setting that allows you to set the distance of each speaker from the listening position. This is important for achieving proper soundstage and imaging. Use a tape measure to measure the distance from the listening position to each speaker and set the speaker distance on the receiver accordingly.

Step 4: Set the Subwoofer Crossover
The subwoofer crossover is the frequency at which the subwoofer takes over the bass frequencies from the main speakers. The crossover setting should be set to the point where the subwoofer blends seamlessly with the main speakers. To set the crossover frequency, play a test tone and adjust the crossover frequency on the receiver until the sound of the test tone is smooth and balanced.

Step 5: Room Calibration
Some AV receivers have room calibration features that can help to optimize the sound for your room. This can include adjusting the speaker size, distance, and level settings, as well as adjusting the bass and treble levels. Follow the instructions in your receiver’s manual to perform room calibration.
Step 6: Final Sound check
Once you have completed the above steps, perform a final sound check by playing a variety of music and movie tracks. Make any final adjustments to the volume, balance, and tone controls to achieve the best sound quality.
It’s important to mention that these steps are a general guide, you should refer to the manual of your specific AV receiver for further details and instructions. Additionally, if you find the process too complex, you can always hire a professional to do the job for you and get the best out of your system.